Old family albums hold timeless stories—faded smiles, unforgettable places, and meaningful moments. But time takes its toll on photographs. They yellow, crease, fade, and sometimes get damaged beyond recognition. Fortunately, digitizing old photos is no longer a job just for professionals. With just your home setup and Movavi Photo Editor, you can preserve, restore, and even enhance those precious memories for generations to come.
In this guide, we’ll walk you through how to digitize old photos at home using Movavi Photo Editor. You’ll learn not only how to scan or photograph your prints but also how to breathe new life into them—removing dust, correcting colors, and organizing them into digital albums or slideshows.
Why Digitizing Old Photos Matters
Digitizing your photos isn’t just about backing them up. It’s about:
- Preserving your family history in high-quality formats
- Protecting against damage from water, sunlight, or age
- Sharing memories with family members around the world
- Restoring beauty to photos that have worn over time
The best part? You don’t need a studio setup. All you need is a scanner or phone camera—and Movavi Photo Editor to take your images from faded to fabulous.
Step 1: Scanning or Photographing Old Prints
Option A: Use a Scanner
If you have a flatbed scanner, this is your best bet for high-resolution scans.
Tips for Scanning:
- Set your scanner to at least 300 dpi (600 dpi is better for archiving)
- Scan in color, even if the photo is black and white
- Wipe your photos and scanner glass gently to remove dust
- Save your scans in TIFF or PNG for best quality (you can convert to JPEG later if needed)
Option B: Use Your Smartphone
Don’t have a scanner? No problem. You can use your phone’s camera or apps like Google PhotoScan.
Tips for Phone Photography:
- Shoot in natural light, near a window or under white LED
- Avoid harsh shadows or reflections
- Place your photo on a neutral background
- Hold the phone directly above the photo
- Use the highest resolution your camera offers
Once captured, transfer the images to your computer for editing in Movavi Photo Editor.
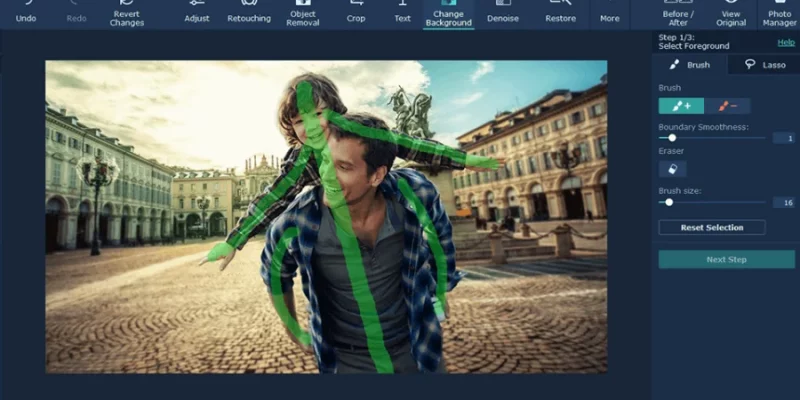
Step 2: Removing Scratches, Dust, and Creases with Movavi
Once your photos are on your computer, open them in Movavi Photo Editor and head straight to the Retouching and Restoration tools.
Use the “AI Restore” Tool
This smart feature detects common damage like creases, tears, and spots and removes them automatically.
- Go to Retouching > AI Restore
- Adjust the intensity depending on how damaged your photo is
- Preview and apply with one click
Use the “Stamp” or “Healing” Brush
For detailed work like:
- Scratches on faces or clothing
- Stains along the edges
- Specks of dust or fingerprints
Zoom in, select the Healing Brush, and gently paint over the imperfections. Movavi blends the surrounding pixels seamlessly.
Pro Tip: Use smaller brush sizes for delicate areas like eyes or facial features.
Step 3: Adjusting Faded Colors and Brightness
Old photos often lose their vibrancy over time. Some turn yellow, others become overly dark or washed out.
Use AI-Driven Auto-Enhance
Movavi’s Auto-Enhance tool instantly improves lighting, contrast, and saturation in one click.
- Go to Adjust > Magic Enhance
- Apply, then tweak manually if needed
Manual Color Correction
For more control, head to the Adjust tab:
- Brightness & Contrast: Increase brightness carefully; boost contrast to sharpen details
- Saturation & Hue: Revive original color tones without making the image look artificial
- Temperature: Cool down yellowed photos or warm up overly blue ones
Tip: Use side-by-side preview to compare before and after edits easily.
Step 4: Cropping and Straightening Warped Images
Old printed photos may be tilted, warped, or have unnecessary borders.
Use Crop & Rotate Tools
- Head to Crop and use Movavi’s predefined aspect ratios or free crop tool
- Use the Straighten slider to align crooked images
- You can also flip or rotate if the image is scanned upside-down
Pro Tip: Leave a small margin around the main subject to keep the original photo’s feel.
Step 5: Saving in High-Resolution Formats
Once your photos are restored, save them in high-quality formats for both backup and sharing.
Best File Types:
- TIFF: Great for archiving; no quality loss
- PNG: High-quality, compressed format
- JPEG: Best for sharing online or emailing, but use max quality settings
Movavi Photo Editor allows custom export settings, so you can choose resolution, format, and quality level with ease.
Tip: Keep both an edited version and the original scan—you never know when you’ll want to try a different restoration approach later.
Step 6: Organizing Digital Albums or Making Slideshows
Digitizing is only part of the fun—you can now relive and share those memories creatively.
Create Themed Digital Albums
Group your photos by:
- Decade (e.g., “The ‘70s Collection”)
- Family member (e.g., “Grandma’s Album”)
- Life event (e.g., “Wedding Day”, “Graduation”, “Family Holidays”)
Use folders on your computer or organize using platforms like Google Photos or Movavi Slideshow Maker.
Make a Slideshow with Movavi Slideshow Maker
Want to turn your restored photos into something extra special?
- Add gentle transitions between images
- Insert music—maybe a nostalgic song that matches the era
- Add captions like dates, names, or short stories
- Export in HD and share with family
Movavi Slideshow Maker integrates seamlessly with your edited images, helping you turn photo restorations into heartfelt visual stories.
Conclusion
Preserving your old photographs doesn’t have to be intimidating or expensive. With the right tools and a little time, you can turn faded prints into vibrant digital keepsakes. Movavi Photo Editor makes the process easy, effective, and even fun—whether you’re fixing decades-old snapshots or just organizing your favorite family moments.
So dust off that old album, grab your scanner or phone, and give those memories the digital glow-up they deserve.
For more information, visit Atnook.


Comments