In the world of YouTube, first impressions matter—a lot. Your intro is the handshake of your channel, giving viewers a quick glimpse of your style, energy, and what they can expect. Whether you’re a vlogger, educator, gamer, or lifestyle creator, a sleek, professional intro can set you apart from the crowd.
The good news? You don’t need fancy software or years of editing experience. With Movavi Video Editor, you can create high-quality YouTube intros that are fast, stylish, and uniquely you. In this blog, we’ll walk you through everything you need to know—from choosing the right length to exporting like a pro.
Why a Good YouTube Intro Matters
YouTube intros serve three major purposes:
- Branding: They make your channel recognizable and consistent.
- Engagement: A polished intro grabs attention within the first few seconds.
- Professionalism: It signals to your audience that your content is worth watching.
Movavi Video Editor offers all the tools you need to build that professional look—without the headache.
1. Choosing the Right Intro Length and Style
Keep It Short and Sweet
Viewers decide within seconds whether to keep watching, so your intro should be 5 to 10 seconds max. Long intros risk boring your audience or causing drop-off.
Match Your Niche
The style of your intro should align with your content:
- Tech & Gaming: Futuristic fonts, glitch effects, electronic music
- Lifestyle & Beauty: Soft pastels, fluid transitions, upbeat music
- Education & Tutorials: Clean layouts, bold text, clear visuals
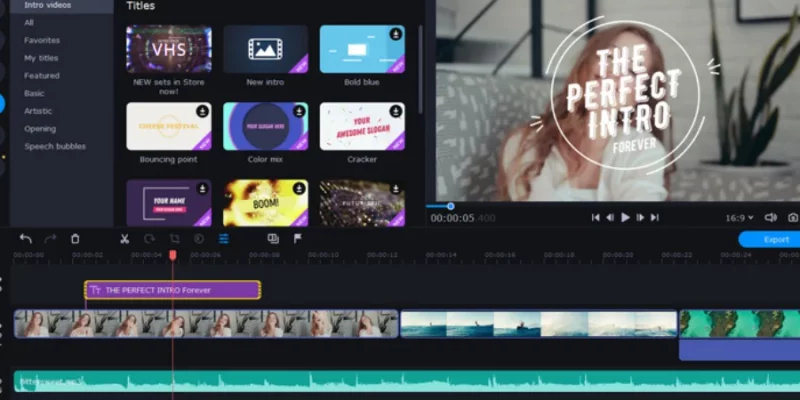
With Movavi, you can choose from pre-designed intro templates or build your own style from scratch using its drag-and-drop timeline editor.
Tip:
Start with a neutral color palette and evolve it as your brand grows.
2. Adding Animated Text and Logo Reveals
Dynamic Text = Instant Impact
Text animation is one of the fastest ways to make your intros look modern and polished. In Movavi:
- Go to the Titles tab and explore animated options like slide-ins, typewriter effects, or pop-ups.
- Customize font style, size, color, and speed to match your channel aesthetic.
- Use motion blur or shadow effects for extra depth.
Logo Reveals That Stick
If you have a logo, it deserves more than a static drop-in. Movavi lets you create custom logo reveals using:
- Keyframe animation for scaling, rotation, or movement
- Overlay effects like lens flare, glow, or light leaks
- Smooth fade-in/fade-out transitions
Tip:
Save your logo animation as a separate project file—you can reuse it in every future intro or video!
3. Using Sound Effects and Background Music
Audio is often overlooked, but it’s key to making your intro feel complete.
Choosing the Right Track
Movavi comes with a built-in library of royalty-free music and sound effects. You can also upload your own tracks if you’re going for a custom vibe.
- Use upbeat, energetic music for entertainment or vlog channels
- Opt for mellow tones for educational or minimalist content
- Loop short jingles if your intro is under 10 seconds
Syncing Sound and Motion
A pro tip: time your animations and text transitions to match the beat or key moments in your audio track. It creates a more seamless, polished result.
Tip:
Lower the volume of background music slightly so it doesn’t overpower your voiceover (if you have one).
4. Exporting in HD for YouTube
Once your intro is ready, exporting it correctly is just as important as making it.
Settings to Use in Movavi:
- Resolution: 1920×1080 (Full HD) or 3840×2160 (4K, if supported)
- Format: MP4 (best balance between quality and compatibility)
- Bitrate: Choose High for crisp visuals
- Frame rate: 30 fps or match the frame rate of your main content
Movavi makes it simple—just hit Export, select YouTube Preset, and you’re good to go.
Tip:
Save your intro as a standalone file so you can easily add it to future videos without editing from scratch.
5. Creating a Consistent Brand Look With Templates
Consistency is what turns casual viewers into subscribers. With Movavi, you can maintain a cohesive look across all your videos by creating or saving branded templates.
Build Once, Reuse Often
- Create a base intro project with your text, logo, colors, and music
- Save it as a template file within Movavi
- Update the visuals or tweak elements per series or season, but keep the core identity intact
Elements to Lock In:
- Font styles
- Color palette
- Logo placement
- Intro sound cue
This consistency not only saves time, but it also builds brand recognition—your audience will start to know it’s your video before they even see your face.
Pro Tips for an Even Better Intro
Here are some quick, high-impact tips to keep in mind:
- Don’t overdo effects: Keep it slick, not noisy. Choose 2–3 effects max per intro.
- Add motion blur sparingly: It adds polish but can reduce clarity if overused.
- Use masks for custom reveals: Try masking shapes over your logo or text to create cinematic reveals.
- Preview frequently: Always check your animation and audio timing before final export.
- Keep testing: Try A/B testing different intro styles to see what resonates most with your audience.
Conclusion
Your YouTube intro doesn’t have to be complicated or expensive—it just needs to be clear, consistent, and a reflection of your style. With Movavi Video Editor, you can create intros that look like they were made by a pro (even if you just started editing yesterday).
From text animations to logo reveals, background music to export settings, Movavi packs everything into one simple platform. So if you’re ready to level up your channel, start by crafting a killer intro that hooks your audience and keeps them coming back.
For more information, visit Atnook.


Comments